Printed in The American Tri-Five magazine in Volume 2 : Issue 1 - Written by Woody's Hot Rodz
Install Mounting Studs:
1. Apply RTV silicone to one end of each mounting stud.
2. Install the 3/8-16 x 4 stud into the bottom passenger side. It should stick out 3 1/2”.
3. Install three remaining studs, sticking out 2 1/2”.
Note: Use the double nuts provided for install if needed.
Install Compressor and Alternator Brackets:
1. Install 4 large & 2 small O rings in compressor and alternator brackets.
2. Slide brackets over studs.
Install Power Steering Bracket:
1. Install power steering bracket using two 3/8-16 x 2” cap screws with anti-seize. Finger tighten.
Install Water Pump and Spacer Posts:
1. Slide water pump over studs.
2. Apply anti seize to the end of the studs.
3. Install the short spacer post to bottom passenger stud
4. Install three remaining (2.69”) spacer posts.
Note: Tighten all spacer posts and two cap screws at this time.
Install Main Bracket:
1. Install main bracket using four M8 x 25mm cap screws & washers with anti seize. Finger tighten.
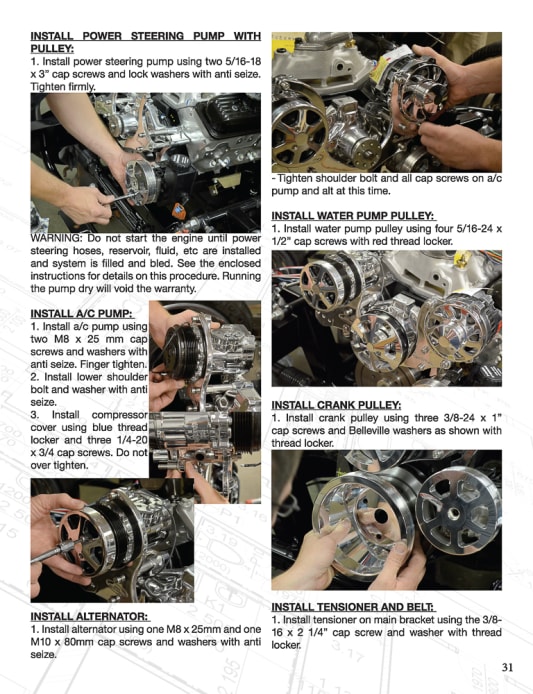
Install Power Steering Pump with Pulley:
1. Install power steering pump using two 5/16-18 x 3” cap screws and lock washers with anti seize. Tighten firmly.
WARNING: Do not start the engine until power steering hoses, reservoir, fluid, etc are installed and system is filled and bled. See the enclosed instructions for details on this procedure. Running the pump dry will void the warranty.
Install A/C Pump:
1. Install a/c pump using two M8 x 25 mm cap screws and washers with anti seize. Finger tighten.
2. Install lower shoulder bolt and washer with anti seize.
3. Install compressor cover using blue thread locker and three 1/4-20 x 3/4 cap screws. Do not over tighten.
Install Alternator:
1. Install alternator using one M8 x 25mm and one M10 x 80mm cap screws and washers with anti seize.
- Tighten shoulder bolt and all cap screws on a/c pump and alt at this time.
Install Water Pump Pulley:
1. Install water pump pulley using four 5/16-24 x 1/2” cap screws with red thread locker.
Install Crank Pulley:
1. Install crank pulley using three 3/8-24 x 1” cap screws and Belleville washers as shown with thread locker.
Install Tensioner and Belt:
1. Install tensioner on main bracket using the 3/8-16 x 2 1/4” cap screw and washer with thread locker.
2. Using a 1/2” drive ratchet, rotate tensioner and install belt.
3. Install tensioner cover using two 10-32 x 3/4” flat head screws with thread locker.
Install Compressor Manifold:
Do not perform this step until you are ready to install AC lines and charge your system!
1. Remove the plate on the top of compressor body. The compressor is Nitrogen charged to insure lubrication of all components during transport. You will hear the gas escaping when you loosen the fasteners.
2. Install manifold as shown using two M8 x 25mm cap screws with anti seize.
WARNING: Do not connect power to the AC clutch wire without first connecting hoses and charging the system. Please follow all of the enclosed instructions for charging your system. Serious damage to your compressor can occur and the warranty will be voided.
AMERICAN TRI-FIVE ASSOCIATION/WOODY’S HOT RODZ IS NOT RESPONSIBLE FOR CUSTOMER APPLICATIONS THAT ARE OUTSIDE THE NORMAL INTENDED USE OF THE PRODUCTS, INCLUDING SPECIFIC MODEL AND YEAR APPLICATIONS, ENGINES EQUIPPED WITH SUPER CHARGERS, AND LATE MODEL EMISSIONS EQUIPPED VEHICLES.