Printed in The American Tri-Five magazine in Volume 8 : Issue 1
Back in April/May issue of The American Tri-Five this year, I walked you through doing a 1-piece floor pan install on my project ‘55 4-door wagon, we discussed how certain scenarios merit doing so, and how it starts to make sense from a time and ease of work standpoint. For a car that needs multiple braces fixed, and/or multiple sections of the floor pan replaced, the one-piece floor is the easiest and best option into the best car you can possibly end up with.
But what about those cars out there that don’t need that much repair work? The car that might have some holes in the floor but solid braces underneath. Maybe some trapped water made for a couple bad spots, but the exterior was fairly dry. These kinds of cars will make sense to leave good metal in place, simply replacing the bad.
Ringing in the first edition of “Chillin’ with Dillon”, we take a look at young Drees’ ‘55 wagon. A true California car, the ‘55 was far from a rustbucket. Things like solid drip rails, usable quarters, a straight roof, and a solid dash made this one a perfect candidate for a builder. Wanting to do it right, Dillon chose to have his ‘55 sandblasted to start, and Patriot Mobile Blasting in Batesville, Indiana took it down to bare steel to know what he was working with. The wagon was solid enough to leave intact, a real “glass half full” scenario, and with the braces being solid enough to work from underneath, the decision was made to install a half floor on the passenger side. On top of that, since this is after all a budget build being completed by a 22-year-old, the half floor is a more…..economical….option to floor repair.
Enough talkin’…..let’s get to doin’!
As you can see, Dil’s wagon has a more solid floor than most upon first inspection, especially on the driver’s side.
…but come over to the passenger side, and more Swiss cheese becomes present. The car sat without glass in for some time, so likely water, dirt, and debris had simply collected in the floor.
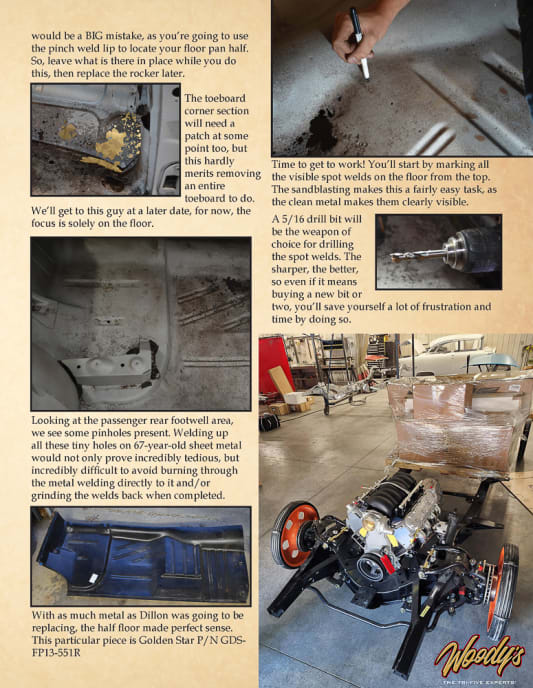
The outer rocker is iffy on top but is structural enough to work from. Removing the outer rocker at the same time would be a BIG mistake, as you’re going to use the pinch weld lip to locate your floor pan half. So, leave what is there in place while you do this, then replace the rocker later.
The toeboard corner section will need a patch at some point too, but this hardly merits removing an entire toeboard to do. We’ll get to this guy at a later date, for now, the focus is solely on the floor.
Looking at the passenger rear footwell area, we see some pinholes present. Welding up all these tiny holes on 67-year-old sheet metal would not only prove incredibly tedious, but incredibly difficult to avoid burning through the metal welding directly to it and/or grinding the welds back when completed.
With as much metal as Dillon was going to be replacing, the half floor made perfect sense. This particular piece is Golden Star P/N GDS-FP13-551R
Time to get to work! You’ll start by marking all the visible spot welds on the floor from the top. The sandblasting makes this a fairly easy task, as the clean metal makes them clearly visible.
A 5/16 drill bit will be the weapon of choice for drilling the spot welds. The sharper, the better, so even if it means buying a new bit or two, you’ll save yourself a lot of frustration and time by doing so.
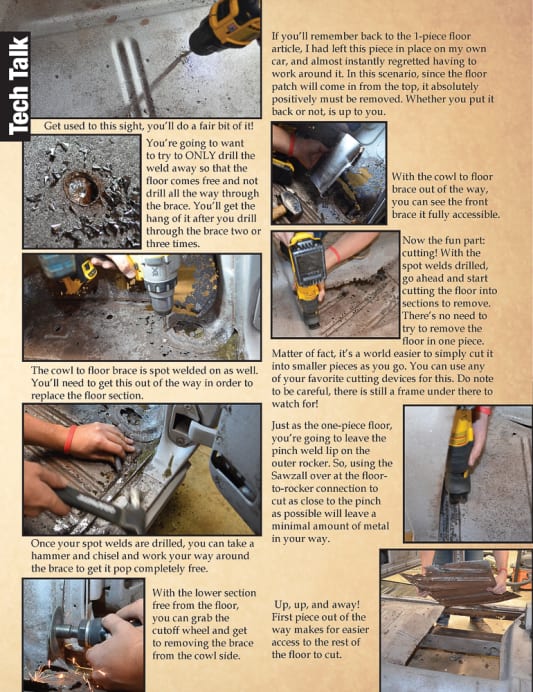
Get used to this sight, you’ll do a fair bit of it!
You’re going to want to try to ONLY drill the weld away so that the floor comes free and not drill all the way through the brace. You’ll get the hang of it after you drill through the brace two or three times.
The cowl to floor brace is spot welded on as well. You’ll need to get this out of the way in order to replace the floor section.
Once your spot welds are drilled, you can take a hammer and chisel and work your way around the brace to get it pop completely free.
With the lower section free from the floor, you can grab the cutoff wheel and get to removing the brace from the cowl side.
If you’ll remember back to the 1-piece floor article, I had left this piece in place on my own car, and almost instantly regretted having to work around it. In this scenario, since the floor patch will come in from the top, it absolutely positively must be removed. Whether you put it back or not, is up to you.
With the cowl to floor brace out of the way, you can see the front brace it fully accessible.
Now the fun part: cutting! With the spot welds drilled, go ahead and start cutting the floor into sections to remove. There’s no need to try to remove the floor in one piece. Matter of fact, it’s a world easier to simply cut it into smaller pieces as you go. You can use any of your favorite cutting devices for this. Do note to be careful, there is still a frame under there to watch for!
Just as the one-piece floor, you’re going to leave the pinch weld lip on the outer rocker. So, using the Sawzall over at the floor-to-rocker connection to cut as close to the pinch as possible will leave a minimal amount of metal in your way.
Up, up, and away! First piece out of the way makes for easier access to the rest of the floor to cut.
This is where additional care will come into play; as you move forward, not only will you be cutting around the frame, you’ll start cutting around the bracing as well. Your drilled spot welds should act as a road map as to where NOT to cut, but feel free to slide under the car as you go to make sure you’re not cutting into anything you shouldn’t be.
Holes in the floor at this point start to make brace location more evident than before!
More cutting! Now up to the front. Make sure to leave more of the transmission tunnel than you think you need, we’ll come back and trim this up later. We’re simply trying to expose the braces at this point.
1With the majority of the floor cut out, it’s time to focus on the detail work to get down to the braces.
This is one place care must be taken. You’ll need to cut through floor, but not far enough to cut all the way through the brace itself. You’re simply trying to give yourself somewhere to start from to peel the floor up.
Once you’ve made your cut, grab your favorite prying tool (and as your local Snap-On guy will tell you, “Remember, screwdrivers are not pry bars.”) and work your way around your brace. What little metal left at the spot weld should pop with little duress.
With the metal peeled back, you can see Dillon’s braces were more than solid enough to merit this type of replacement.
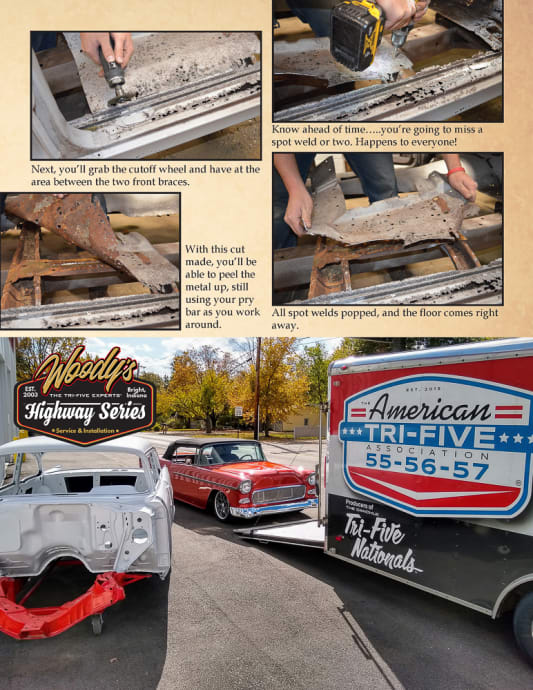
Next, you’ll grab the cutoff wheel and have at the area between the two front braces.
With this cut made, you’ll be able to peel the metal up, still using your pry bar as you work around.
Know ahead of time…..you’re going to miss a spot weld or two. Happens to everyone!
All spot welds popped, and the floor comes right away.
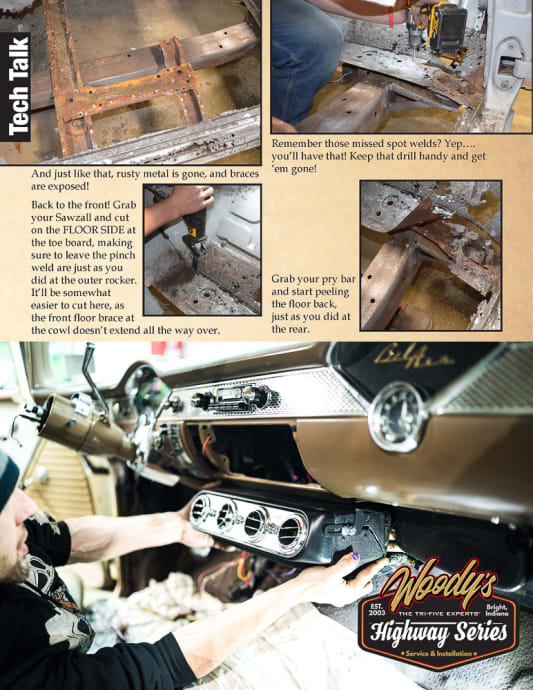
And just like that, rusty metal is gone, and braces are exposed!
Back to the front! Grab your Sawzall and cut on the FLOOR SIDE at the toe board, making sure to leave the pinch weld are just as you did at the outer rocker. It’ll be somewhat easier to cut here, as the front floor brace at the cowl doesn’t extend all the way over.
Remember those missed spot welds? Yep….you’ll have that! Keep that drill handy and get ‘em gone!
Grab your pry bar and start peeling the floor back, just as you did at the rear.
Since Dil had a fair bit of rust to deal with here, the floor didn’t come off quite as nice as the rear section. Frankly, this will be a common floor rot spot to deal with.
You’ll likely need the cutoff wheel to trim this section as far back as possible.
This brace had a bit of rust at the lip but was still more than workable.
With all of your floor free, wheel over your shopvac and sweep all the leftover floor pan and 67 years of rust and dust out of your braces.
Grab your favorite sanding device and hit all your spot welds and flanges to get everything as smooth as possible. A pneumatic grinder and roloc disc make quick and easy work of this and is a welcome addition to any tool box when doing metalwork.
With your flanges clean and smooth, grab a brush, or a drill with a wire wheel, and hit the inside of your braces to knock down any rust inside to prolong their life.
It’s almost amazing the floor could look like it did, and these braces be this solid. But this is exactly why Dillon chose to go the more affordable route, save what he had, and use a floor section instead of the 1-piece.
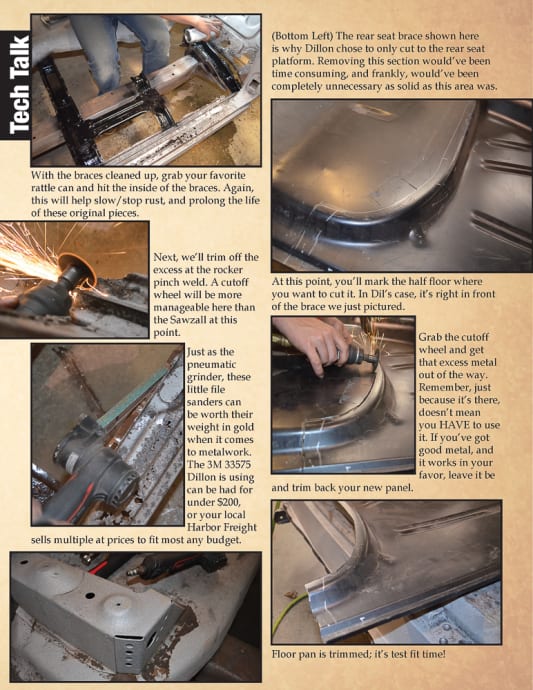
With the braces cleaned up, grab your favorite rattle can and hit the inside of the braces. Again, this will help slow/stop rust, and prolong the life of these original pieces.
Next, we’ll trim off the excess at the rocker pinch weld. A cutoff wheel will be more manageable here than the Sawzall at this point.
Just as the pneumatic grinder, these little file sanders can be worth their weight in gold when it comes to metalwork. The 3M 33575 Dillon is using can be had for under $200, or your local Harbor Freight sells multiple at prices to fit most any budget.
(Bottom Left) The rear seat brace shown here is why Dillon chose to only cut to the rear seat platform. Removing this section would’ve been time consuming, and frankly, would’ve been completely unnecessary as solid as this area was.
At this point, you’ll mark the half floor where you want to cut it. In Dil’s case, it’s right in front of the brace we just pictured.
Grab the cutoff wheel and get that excess metal out of the way. Remember, just because it’s there, doesn’t mean you HAVE to use it. If you’ve got good metal, and it works in your favor, leave it be and trim back your new panel.
Floor pan is trimmed; it’s test fit time!
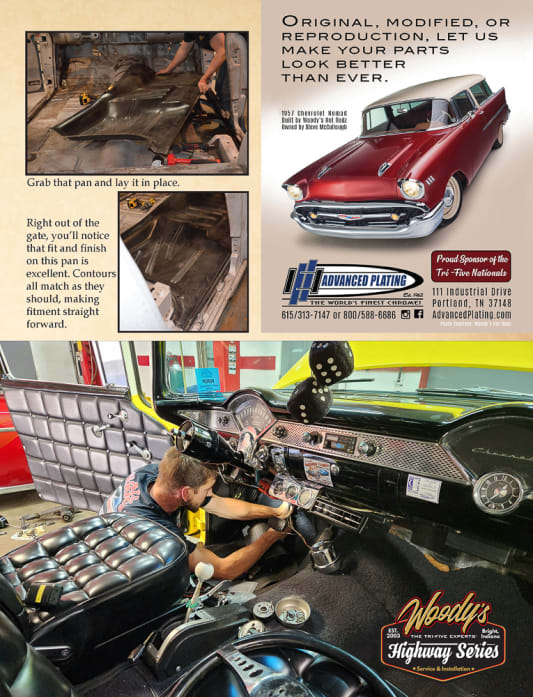
Grab that pan and lay it in place.
Right out of the gate, you’ll notice that fit and finish on this pan is excellent. Contours all match as they should, making fitment straight forward.
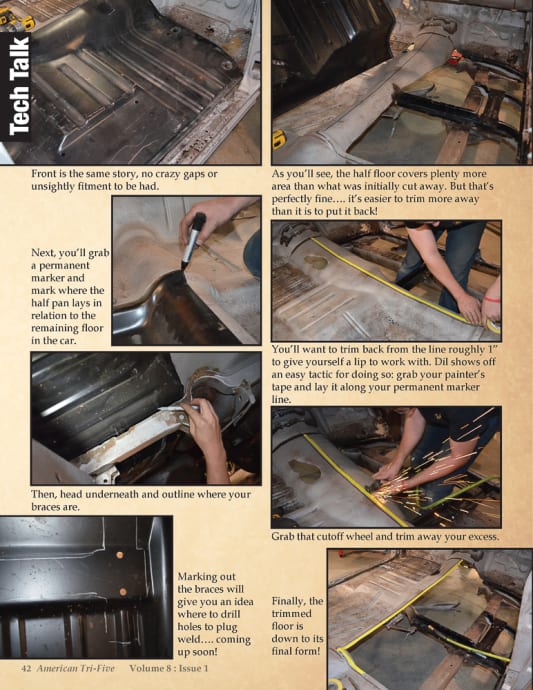
Front is the same story, no crazy gaps or unsightly fitment to be had.
Next, you’ll grab a permanent marker and mark where the half pan lays in relation to the remaining floor in the car.
Then, head underneath and outline where your braces are.
Marking out the braces will give you an idea where to drill holes to plug weld…. coming up soon!
As you’ll see, the half floor covers plenty more area than what was initially cut away. But that’s perfectly fine…. it’s easier to trim more away than it is to put it back!
You’ll want to trim back from the line roughly 1” to give yourself a lip to work with. Dil shows off an easy tactic for doing so: grab your painter’s tape and lay it along your permanent marker line.
Grab that cutoff wheel and trim away your excess.
Finally, the trimmed floor is down to its final form!
You’re going to expose more brace here. Grab your rattle can and touch up over. Rust is the enemy, and prevention is the best attack.
Head to the new floor pan, grab that drill again, and drill some holes roughly 3/8” inward from your brace outline. This will allow you to plug weld the floor to the existing brace.
Just like the factory did it!
Next, hit the areas with the plug weld holes on the floor with the roloc to form a clean surface to weld to.
Floor pan is fully prepped and ready to install!
Go ahead and set the floor pan in for the last time to check final fit.
….and for good reason. This pan required a slight amount of trimming in the transmission tunnel area to get it to drop in perfectly. Remember, no two cars are alike, so results will vary slightly. You may need to trim some off in a completely different area for your particular car.
With your pan trimmed and setting flush, you see Dillon has the vise-grips out. Clamping the new floor to the aforementioned outer rocker pinch weld makes for easy location.
You’ll do the same clamping the floor to the pinch at the toe board.
To keep the pan in place, Dil recommends using some self-tappers. This certainly beats having to lean on the pan as you go and ensures your pan won’t move as you do as well.
With the self-tappers in place, we’re ready to weld!
Dil chose to start at the transmission tunnel, as this area will get fully welded instead of tacked. This likely adds an additional level of stability and serves as a good starting point.
Make sure you stand back and say “that’s not going anywhere” to ensure fitment and proper adhesion. Ok, maybe that has nothing to do with it, but you’re going to say it anyways….
Next, move onto your plug welds. Make sure you’ve got ample penetration on both pieces, but remember, that metal you’re welding to is likely older than you are, so exercise some level of caution.
With plug welds completed, we’ll head to the seat platform. Since we’re dealing with more than one plane, some amount of tap and stitch will be required here no matter what. Put a few tacks in your corner and work outward.
A body hammer goes a long way here, but a normal hammer and a chisel or screwdriver (but not your Snap-On one, as you’ll be politely informed it is not a chisel, just as it is not a prybar) will do in a pinch just the same way. Simply take up the gap.
….then stitch together as you go.
As you see, gap closes, and fit is as good as you could ask for. This small amount of extra work is a far cry from cutting off the seat brace, so Dil most certainly made the right call here.
Your body hammer will again come in handy in the corner section, as it will be almost impossible for this to fit perfectly right off the rip. Simply tap in to take up the gap….
….And weld everything solid, no tacks or stitching here.
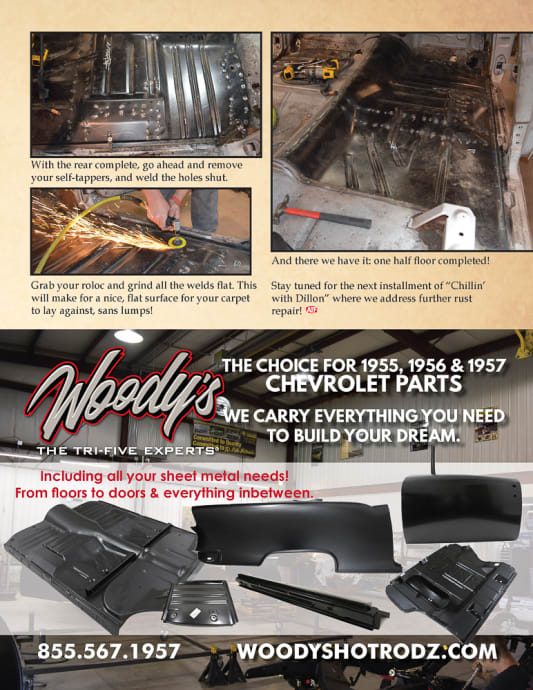
With the rear complete, go ahead and remove your self-tappers, and weld the holes shut.
Grab your roloc and grind all the welds flat. This will make for a nice, flat surface for your carpet to lay against, sans lumps!
And there we have it: one half floor completed!
Stay tuned for the next installment of “Chillin’ with Dillon” where we address further rust repair!
For Floor Pans, click here.