Printed in The American Tri-Five magazine in Volume 8 : Issue 6
Maybe you’ve been there, maybe you haven’t, but for those of us into high horsepower, it has happened at least once. Maybe it was at the track, maybe it was looking to show off a little for your buddies, but at any rate, you put your Tri-Five into gear, tromp the gas pedal, and instead of forward progress, that sickening feeling of the rearend bouncing up and down reverberates through the whole car. If you’re lucky, you get out of the throttle before the parts start flying.
If you’re not lucky….well….you’re picking up pieces of u-joint off the street/track, or picking up broken teeth off the ring gear out of the rearend housing.
Yup, you’ve been struck by the dreaded “wheel hop”.
First things first, let’s explain some of what “wheel hop” actually is. In the case of a leaf spring car, it’s actually two parts: “Spring wrap”, in turn causing “wheel hop”. Wheel hop itself is the rapid loss and gain of traction at the drive tire. When you trounce down on the gas pedal and apply force to the rear tires on your leaf-spring equipped Tri-Five, the torsional force applied to the leaf spring actually causes the spring itself to rotate at the rearend mounting point, AKA spring wrap. Being as you’re applying force to a long strap of spring metal, the force is returned back through the spring, physically forcing the tire up and down, causing the loss and gain of traction at the tire…AKA, wheelhop.
So, how do we stop it? A traction bar, that’s how! How does a traction bar stop it? Simple: axle rotation at the rearend mounting point comes to a stop by the traction bar acting as a lever, providing a positive stop ideally at the eyelet of the leaf spring and preventing the spring from wrapping up all together.
Whether you’re young or old, you’re sure to have seen a set of those yellow Lakewood slapper bars (or the many alternative brands) bolted to the leaf springs of something over the years. And where they do an “ok” job, they certainly have their downfalls. One being, on a Tri-Five, most “universal” traction bars wind up too short; as mentioned earlier, you want the rubber snubber at the eyelet of the leaf spring for optimum wrap control, but applying full load behind the spring eyelet is actually applying pressure in the weakest point of the leaf spring, and can actually bend the spring itself in short order (just as excessive wheelhop can all the same). Two, most of the classic style of traction bars hang LOW and can potentially be a striking point for road hazards. Three, they offer little to no adjustability, outside of playing with different snubber heights and air gap under the spring eyelet.
Which brings us to our next talking point: CPP’s Adjustable traction bar kit!
CPP’s Traction bar kit (P/N CPP-5557TB) is an option far more advanced than the “slapper bars” of old. Their heim jointed, adjustable bar and pivot front mount design applies both lift and pressure directly at the eyelet of the spring, allowing not only for spring wrap control, but for leafspring preload all the same. What this makes for is not only less wheelhop, but more actual traction all the same!
Let’s dive into our install!
The test mule for these traction bars? None other than the infamous Speed Kills '55 Sedan Delivery gasser (left). Admittedly, I’m amazed this car has made it as far as it has with no broken parts. The BES built 355ci aluminum head small block and Super T10 combo definitely provides more than enough grunt to worry about it but has played nice so far.
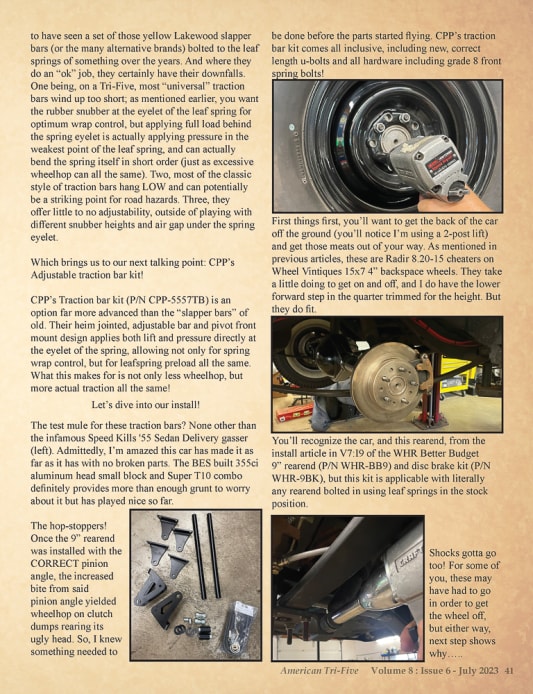
The hop-stoppers! Once the 9” rearend was installed with the CORRECT pinion angle, the increased bite from said pinion angle yielded wheelhop on clutch dumps rearing its ugly head. So, I knew something needed to be done before the parts started flying. CPP’s traction bar kit comes all inclusive, including new, correct length u-bolts and all hardware including grade 8 front spring bolts!
First things first, you’ll want to get the back of the car off the ground (you’ll notice I’m using a 2-post lift) and get those meats out of your way. As mentioned in previous articles, these are Radir 8.20-15 cheaters on Wheel Vintiques 15x7 4” backspace wheels. They take a little doing to get on and off, and I do have the lower forward step in the quarter trimmed for the height. But they do fit. This kit is applicable with literally any rearend bolted in using leaf springs in the stock position.
Shocks gotta go too! For some of you, these may have had to go in order to get the wheel off, but either way, next step shows why…..
…leaf spring plates get removed in order to install the longer u-bolts required to accommodate the rear bar brackets. Support the rearend itself, rattle those nuts off the u-bolts, and remove the plate.
From here, you’ll move to the front, and remove the front leaf spring bolt. You’ll likely need a long punch or drift pin to knock the bolt back through the frame.
Take your leaf spring and swing it away from the front spring pocket. Being on a lift allows me to swing the spring completely vertical, but not necessary for removal.
Next, undo your leaf spring shackle nuts, and remove the retainer plate. From here, levels of persuasion for removal may vary depending on the age of bushings. Since I greased these bushings well the last time I installed them, the leaf spring didn’t give me much trouble at all coming off.
And just like that, the leaf spring is out of the way. I’ve ran these Calvert Racing monoleafs for some time, but to be perfectly honest, I wasn’t really happy with them on my race car due to incredibly stiff spring rates, and they weren’t any better for a street car application either. I had a spare set of Woody’s 5-leaf springs (P/N WHR-80017C) laying around, so I decided to run them instead. If you’re still on original leaf springs, this may not be a bad time to replace them since you’ll have it all apart.
This will be the only part that might get tricky for some DIY’ers; the front bushing of the leafspring needs to be pressed out by any means necessary. Without a hydraulic shop press, it isn’t impossible, but just more difficult.
The CPP traction bars use a two-part front eyelet bushing: a Delrin bushing, and a steel sleeve. This prohibits any amount of deflection, such as what a rubber bushing would allow.
The two pieces will be installed separately, so slide the steel sleeve out and set it off to the side, we’ll come back to it in a minute.
If you’ve followed my articles in the past, you’ve seen this tub before. This synthetic brake grease is my go-to for lubricating multiple brake and suspension pieces for years of trouble-free operation. Sta-Lube is my brand of choice here.
Lubricate the Delrin bushing with your brake grease, creating a thin layer all the way around.
Next, you’ll install the bushing into the eyelet. This can be accomplished many ways, but since the fit wasn’t STUPID tight, I chose to simply grab a hammer and a block of wood and tap it into place. Some care must be taken here; a hard hit directly to the Delrin WILL break it, so work gingerly. Note that many leaf springs will have varying eyelet dimensions, so experiences installing this bushing may vary.
With the bushing in place, grab your front leaf spring bracket, and slip it over the eyelet, with the cross strap on the TOP SIDE of the leaf spring. This is how this guy works!
Grab two of the supplied Delrin washers, insert one on each side of the bracket, and slide it down over the eyelet. Note the steel sleeve is NOT installed yet. Don’t get ahead of yourself!
Grab your steel sleeve and lubricate it just as you did your bushing.
Take your hammer and tap the sleeve into place.
You’ll see why the sleeve comes later than the bushing at this point: The front pivot bracket actually rides on this steel sleeve, as it is wider than the leaf spring eyelet itself. The Delrin washer ensures years of free movement.
Leaf spring is ready to install. Note the lack of bushings in the rear….
…..and this is why! Again, while we’re here, replacing any crusty bushings is a must for optimum performance, and CPP recommends using a polyurethane bushing in the shackle as well. So, we opted to simply use an entire shackle kit from CPP (P/N CPP-CP55SHK-RP) to take care of this in one fell swoop. There’s nothing NOT to like about these guys: The plates are beefier than factory and come with both rubber and urethane bushings. NOTE: '55 and '56-57 use a different part number.
The shackles on this guy were just “ok” when I replaced the suspension last time, so an upgrade will be welcomed. Flip your shackles horizontally and use your favorite hammer to knock them out. You may need to take a punch and drive your bushings out, depending again on how crusty they are.
Clean your leaf spring hangers well and apply a layer of grease to them….
….as well as your bushings. This is CRUCIAL with urethane bushings to have some kind of lubricant in play; they’ll get noisy in a heartbeat without!
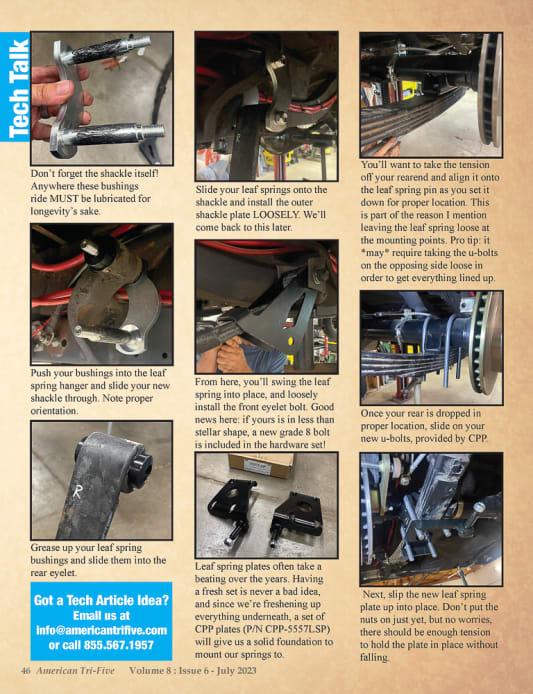
Don’t forget the shackle itself! Anywhere these bushings ride MUST be lubricated for longevity’s sake.
Push your bushings into the leaf spring hanger and slide your new shackle through. Note proper orientation.
Grease up your leaf spring bushings and slide them into the rear eyelet.
Slide your leaf springs onto the shackle and install the outer shackle plate LOOSELY. We’ll come back to this later.
From here, you’ll swing the leaf spring into place, and loosely install the front eyelet bolt. Good news here: if yours is in less than stellar shape, a new grade 8 bolt is included in the hardware set!
Leaf spring plates often take a beating over the years. Having a fresh set is never a bad idea, and since we’re freshening up everything underneath, a set of CPP plates (P/N CPP-5557LSP) will give us a solid foundation to mount our springs to.
You’ll want to take the tension off your rearend and align it onto the leaf spring pin as you set it down for proper location. This is part of the reason I mention leaving the leaf spring loose at the mounting points. Pro tip: it *may* require taking the u-bolts on the opposing side loose in order to get everything lined up.
Once your rear is dropped in proper location, slide on your new u-bolts, provided by CPP.
Next, slip the new leaf spring plate up into place. Don’t put the nuts on just yet, but no worries, there should be enough tension to hold the plate in place without falling.
Next up, we have the rear traction bar mounts. Each mount slides over the u-bolts and captures the rod end below.
Slide your mounts on the u-bolts and use the provided nuts to cinch them down. I like the longer style u-bolt nut like CPP provides, these guys offer plenty of engagement for added strength.
Go ahead and cinch these nuts tight. Remember, U-bolts do stretch, so you don’t have to absolutely kill these things, just get them good and tight.
With the leaf spring plates tight, you can tighten up your shackle nuts and front eyelet bolt. Remember, you want the shackle to be able to move, so again, no need to kill this torque-wise. The CPP shackles come with lock-style nuts, so no worry of them coming off. At the front, you can cinch down tight.
And just like that, you’re done with the leaf spring!
Next, we’ve moving onto the traction bars themselves. The bars are thick wall tubing, guaranteed to take a real beating no matter what your power level, and use Heim joints at each end. These joints are left hand thread on one end, right hand on the other, so adjustment can be made without removing them from the vehicle. You’ll start by taking your rod ends and adding a dab of grease or anti-seize to the threads to prohibit galling and make future adjustments a cinch.
Next, slide on the proper jam nut.
Then, install the heim joint into the bar. The notched end shown is the left-handed (aka reverse) thread. Lefty tighty, righty loosey!
Install the heim joint at the other end of the rod. You’ll want to start with this guy almost as long as you can make it for ease of installation, making both ends fairly even with the jamb nuts loose. You’ll shorten the bar in later steps.
We’ll start at the front of the bar for installation. Take the included spacers, insert them into the heim joint, slip it into the pivot bracket, and install your bolt. You can crank this bolt down tight, as the heim is free to pivot.
Next, insert the sleeve into the heim joint for the rear mount. Notice no additional space required to either side, this joint fits nice inside the tabs of the rear mount with no room to take up.
Slide your bolt in at the rear. You may need to move the front pivot in order to get everything to line up. Again, you can really cinch this bolt down, it’ll still move freely even if you do. I try to keep these oriented the same side-to-side for adjustment purposes, FYI.
From here, you’re done bolting parts on. Complete the process on the other side….
….then bolt your wheels back on. Starting to see the light at the end of the tunnel!
You’re done in the air; the next steps need to be completed with all four wheels on the ground. Be sure to give the suspension a good bounce to make sure the shackles/springs are settled where they should be, and you can adjust the bar length.
The top strap of the front pivot is intended to make contact with the top of the leaf spring. This is akin to all the top-name traction bars and is what really provides the bite and anti-wrap characteristics. As you can see, as the car set down on the suspension, the strap is far away from the leaf, so the bar needs shortened.
Grab your bar and turn it to shorten it until the strap just touches the leaf spring.
This is a reasonable configuration for a street car that sees some action, and will still move freely with the suspension travel. For drag race applications, the adjustable bar can be used to preload the suspension, one of the bigger advantages over an old-style slapper bar. Or, if you don’t get too excited on the street, you can loosen them up to the point of no contact at all, and still maintain factory ride quality, but crank them down if you want to get wild.
Tighten your jamb nuts, and you’re done with your bars.
Slide your shocks back on, bolt them down, and the job is complete!
I was actually worried about trying to keep a fairly “period-correct” look with this car, but don’t at all hate the look of the bar on a build like this either. Gain in function is hard to ignore as well!
The installed product is something to be proud of. CPP Traction Bars are a quality viable option for anyone looking to control wheelhop and add some grip to the equation.
Test hits (in a controlled environment performed by professionals) show even tire application, no wheelhop whatsoever, and straight tracking. Mission accomplished!